In this easy and detailed step-by-step tutorial you will learn:
- How to create a subdomain, install WordPreIss there and copy your website to this subdomain using WP Clone plugin.
- How to remove the subdomain and clean everything up after your experiments.
- Some notes about restrictions of this free method of creating a copy of your website and alternative (more convenient and professional) ways to clone your site for testing using staging environment.
Another implementation of cloning websites may be simply duplicating sites. For example, I create copies of a WordPress site within a couple of minutes to use them on different hosts to monitor their performance for my Hosting Performance Contest project.
Contents [hide]
- Intro
- Restrictions To Clone Website
- Best Alternatives To This Free Method Of Creating A Copy Of Your Website For Testing
- Video Tutorial How To Create A Copy Of Your Website For Testing For Free
- Step 1: Backup Your Website Before Making Any Changes
- Step 2: Set Up Your New Test Site On A Subdomain
- Step 3: Create Backup To Clone Website
- Step 4: Clone Your Website – Deploy Your Test Site
- Step 5: Check That Your Test Site Works And Hide It From Search Engines
- Step 6-7: Experiment On Your Test Site And Then Make Changes On Your Original Site
- Step 8: Remove Your Test Site And Clean Up
- Conclusion
Restrictions To Clone Website
Although WP Clone is very easy tool to clone website, you may need to know about some restrictions. There are good chances you don’t need to bother about them, but anyway there you go:
- Cloning your website using WP Clone may take an hour or more if you website is more than 2 GB in size. But I find this plugin working well only for small sites (under a couple of hundred megabytes). There’s another plugin All In One WP Migration which has a similar functionality, but it works more stable (the plugin is free for websites upto 500 MB).
- Also, if you use caching, security or redirecting plugins, you may have to re-install them on your test site.
- Note that WP Clone does not make the 100% exact clone of your website. For example, it does not clone your custom folders or files (including .htaccess) in your WordPress installation folder (e.g. in public_html). However, if you are not going to migrate your website, and you just want to use WP Clone to create your site copy for further testing, then it’s likely you don’t need to bother about that (especially if you are not aware of custom files or folders). Or you can to copy your files and folders manually.
- As noted at the plugin description, you should not use this plugin on WP Engine and some other hosts which use proprietary file system. It’s very likely that you are ok to use WP Clone with any shared hosting though.
Although you may be a bit hesitating now because you are not sure about all these restrictions, but don’t worry. In most cases you can go fine with WP Clone.
Best Alternatives To This Free Method Of Creating A Copy Of Your Website For Testing
In this post I describe the simplest way how to get a copy of your website for free. The core of this method is using WP Clone by WP Academy plugin. There are other great plugins such as Duplicator or All-in-One WP Migration which allow you to clone website, but WP Clone is the quickest and the easiest way to do it for smaller sites (under 2 GB or so).
However, in my own experience I find WP Clone plugin working well only for small sites (under a couple of hundred megabytes). Although the plugin works the fastest compared to its alternatives.
Another plugin, All In One WP Migration, has a similar functionality. And it’s also very easy to use (see my tutorial here). I love this plugin for being more stable. The plugin is free for websites upto 500 MB. I consider this plugin as the best alternative to WP Clone.
As regards Duplicator plugin, it’s not as easy to use. But it’s more fundamental compared to WP Clone. Although Duplicator can’t handle big sites too (usually due to shared hosting resources restriction). Even its paid version has a limit of handling websites 2 GB maximum.
Anyway, it may be not convenient each time to make a copy of your website like that using a plugin. Moreover, using cloning plugins can’t manage to push live your changes to your original site. It’s supposed that you just repeat the changes on your original site when you make sure they work on your test site.
Ideally, you just need to be able to clone your website and also push your changes from your test site to your original site with simply one click. But this is not possible without special staging (or testing) environment on you hosting.
So, if you are a website developer or just need to experiment often, you may want to use a specific functionality on a hosting level, because it’s much more convenient and more reliable to use. As I’ve noted it’s called staging environment and it’s available at some hosting providers such as SiteGround (very affordable prices), WP Engine and GetFlyWheel. By the way, these hosts offer Git integration as well. All these hosts are very good and recommended.
Just for an educational record: To be technically precise, staging and testing environments are different things, but for our needs it makes no sense in differentiating them. Thus, to simplify I mean the same thing under both ‘testing environment’ and ‘staging environment’ in this post. And if you are puzzled by these technical words, just ignore it without any hesitation and go on with the tutorial 
Congratulations! The theoretical and the most difficult part of this blog post is already behind
Let’s rock with easy practice!
Let’s rock with easy practice!
Video Tutorial How To Create A Copy Of Your Website For Testing For Free
On this video I show you step by step how to create a copy of your website using WP Clone. The video starts from creating a subdomain where your clone website will reside. And the video finishes with deleting the subdomain and cleaning everything up.
In the tutorial below I explain basically the same, but I add some notes.
Step 1: Backup Your Website Before Making Any Changes
It’s a good piece of advice whenever you are going to do some changes on your website.
You may want to back up your whole hosting account creating a full cPanel backup (if you are on a shared hosting, such backup can be restored by your host). Also you can create partial cPanel backups of your files and databases separately (you will be able to restore them by yourself if you need it). I have tutorials about cPanel backups here.
By the way, I use a hassle-free, very reliable and super convenient backup solution CodeGuard(you may find my comparison review here).
So, I consider that you have your backups and you are safe. Now let’s move on.
Step 2: Set Up Your New Test Site On A Subdomain
This chapter contains two parts: creating a subdomain in cPanel and installing a default WordPress site on this subdomain.
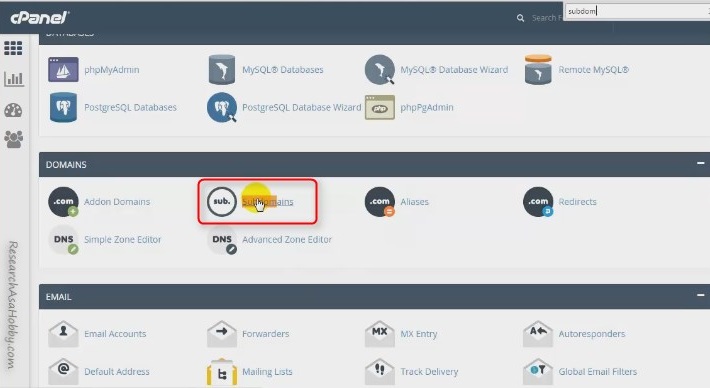
2.1. Create the subdomain
Log in to your cPanel and click Subdomains:
Specify the name for a new subdomain and create the subdomain:
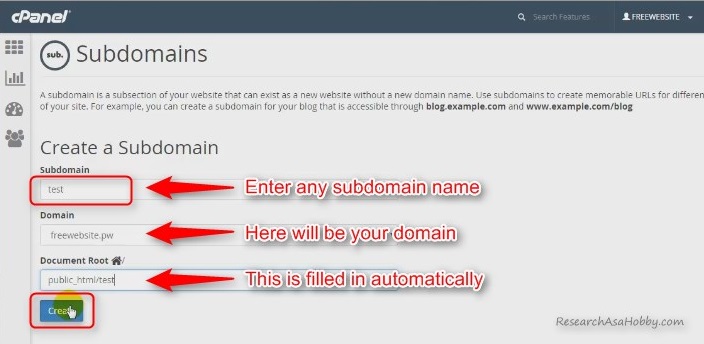
You have created subdomain for your clone website!
2.2. Install WordPress on the subdomain you created
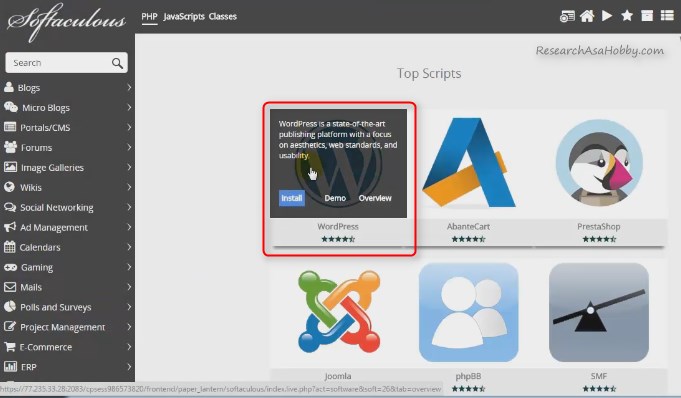
Now go back to your cPanel, locate WordPress installer (or Softaculous and then WordPress installer in it) and click it:
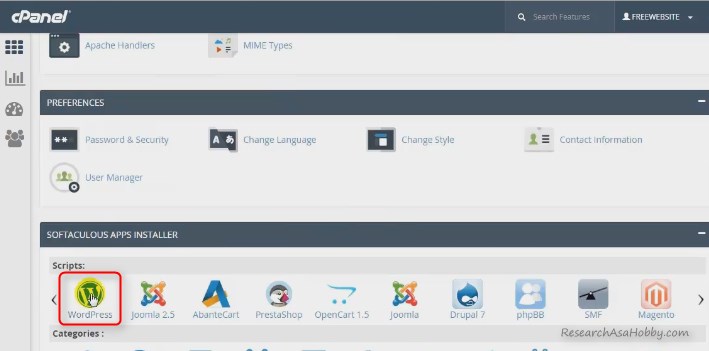
When installing WordPress make sure you select the subdomain:

Be careful and do NOT select your website domain without the subdomain. Select the subdomain. Otherwise you will destroy your original website.
The other part of installing WordPress is nothing special. Watch the video tutorial I put in the beginning of this post if you want to see how I installed WordPress on my subdomain.
Step 3: Create Backup To Clone Website
This chapter contains two parts. The first part is about installing WP Clone plugin on your original WordPress website which you want to clone. And in the second part I will show you how you can create backup with WP Clone. It’s very easy.
3.1. Install WP Clone plugin on your original website
Nothing special in this part. Just login to your original website Dashboard and install WP Clone by WP Academy plugin the usual way. I.e. go to Dashboard / Plugins / Add new /, search for WP Clone plugin and install it.

Then activate the plugin. That’s it.
3.2. Create a backup of your original site with WP Clone
It’s a very sweet part, because it’s just one-click action
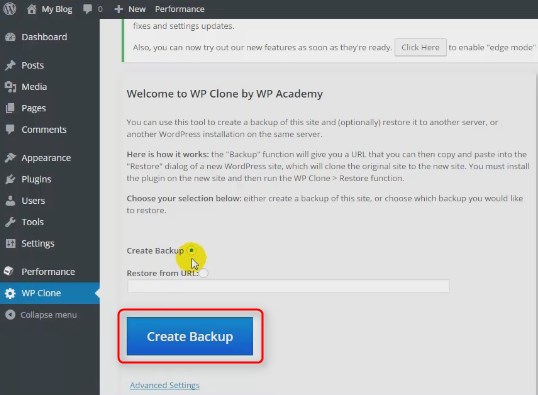
Yes, it’s that simple.
WP Clone plugin is ready to be used out of the box, right away after installation. But it also has some advanced settings for specific or advanced needs. These settings can be used for excluding folders, including non-WordPress database tables, memory settings for performance optimization etc.
However, if your website is not big (say, under 1-2 GB), then all you’ll need to do in most cases is just to click one button with all the settings set by default.
If your site is bigger, then in order to reduce the time of cloning, you may want to exclude some heavy folders, e.g. /wp-content/uploads/ where your images are stored.
Also, you don’t want to clone folders with backups. So, if you use a backup plugin that stores the backups within your WordPress installation folder (which is not a good practice by the way, then exclude this folder too.
Here’s where in WP Clone advanced settings you can exclude folders and big files (e.g. media files) from your being restored on your clone website:

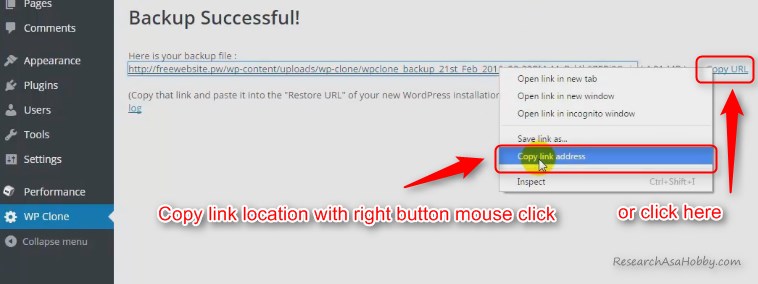
When you create backup with WP Clone, you get the link where the backup has been put. Copy this link address – you’ll need it on the next step when you restore the backup on your test site:
Step 4: Clone Your Website – Deploy Your Test Site
This chapter contains two parts. The first part is about installing WP Clone plugin on your test website. And in the second part I’ll show you how to restore the backup created with WP Cloneon your test website to perform the cloning.
4.1. Install WP Clone on your test site
Installing WP Clone plugins is the same simple operation as I described above.
Install this plugin on your test site which is on the subdomain you created.
Install this plugin on your test site which is on the subdomain you created.
4.2. Restore WP Clone backup on your test site
This is the sweetest part. Because you can do this the heaviest job very easily by pressing literally one button.
You just need to open WP Clone section on your test site, select option “Restore from URL”, specify URL with your WP Clone backup (the link you copied on this step when you created the WP Clone backup), select “I agree” box to confirm restoration and click “Restore” button.

Now your clone website is almost ready. The only thing is left is to make some checking. Read the next short chapter for that.
Step 5: Check That Your Test Site Works And Hide It From Search Engines
You need to do basically two things in your test website:
- Hide your test site from search engines to avoid possible duplicate content issues (can be bad for SEO). You can do it in Dashboard / Settings / Reading :
- Re-save your permalinks (Dashboard / Settings / Permalinks)
- And just open your test site, see if it’s the same as your original site and click some links (e.g. open a blog post) to check that links on your test site work.

You may also want to re-install your caching and security plugins (as well as redirecting plugins) if you use and if you need them on your test site.
That’s it with setting up the clone website!
That wasn’t difficult, was it?
Now you can experiment on it as much as you want.
That wasn’t difficult, was it?
Now you can experiment on it as much as you want.
Step 6-7: Experiment On Your Test Site And Then Make Changes On Your Original Site
There’s no tutorial for this part, because it’s totally up to you.
For example, you can install new themes or plugins to see if they work for you well. Or you may completely change the design of your clone website. Or do anything with it.
So, you make any changes on your test website, see if they are good and apply these changes on your original site too.
Unfortunately there’s no ‘push’ functionality when you could move your changes from your test website to your original site easily without repeating these changes on your original site. For this purpose you need hosting with staging environment. Check out these hosts that I recommend that offer staging environment for convenient testing and development: SiteGround (it has very affordable prices), WP Engine (one of the acknowledged great WordPress managed hosting) and GetFlyWheel (more affordable WP managed host).
Step 8: Remove Your Test Site And Clean Up
When you are done with testing, you may want to delete your test site (to free up space on your hosting or to create a new clone website instead of this one).
To remove completely your test website that you have created following this tutorial, you need to do these steps:
- Remove installation of WordPress on your test site.
- Remove folder for your subdomain
- Remove the subdomain
Steps 2 and 3 can be done in any order.
8.1. Unsintall WordPress on you test site
In order to delete WordPress installation on your clone website (on the subdomain you created), you need to go to your cPanel / Softaculous / current installation for WordPress and remove your test site installation:


Be careful when uninstalling – select the subdomain where your clone website reside, not the root domain with your original website


8.2. Remove folder for your test subdomain
Go to cPanel / File manager / public_html / , locate the folder associated with the subdomain you created for your test site and delete it. This folder will be already empty after you uninstalled WordPress on the previous step.

8.2. Remove your test subdomain
Go to your cPanel and click Subdomains:
And then remove your test subdomain:
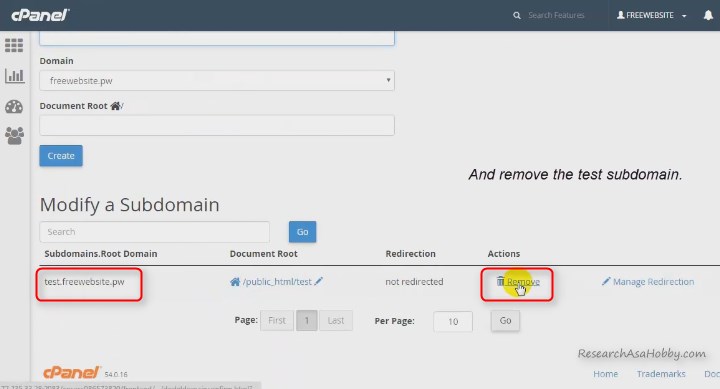
That’s it! You have removed the clone website completely.