check it out boys ...
Friday, January 12, 2018


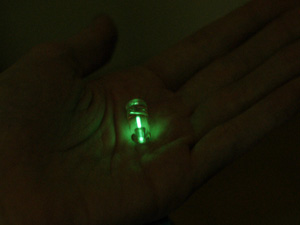
welcome back to war!!! so, you started thinking...homemade nuclear reactor, right!!!! ...:) I have news for you...its so imple it hurts....LOL..."Tritium is a ‘superheavy' hydrogen, it has half-life of 12.32 years. It's decay products are Helium" if you take it from the light (previous post on eBay) don't inalate, or touch it, with your skin...however " if it get burn into water, it might end up being part of your body cells, and you will get maximum possible radiation over next few decades." So...what's a reactor after all? you must reflect all the light possible of the tritum electrons, like on photo 1, surrounded with aluminium foil, inside and out; then you must get yourself a solar cell to focus on the tritum base (photo 2) but actually you can just turn on with 1.5v ...and Bingo!!!! you have the most incredible almost ..."stupid" (?) nuclear reactor at home.


https://3.14.by/en/read/building-nuclear-reactor-at-home
Building nuclear reactor at home - from scratch
 Some time ago I've published article about homemade cpu's, and today we'll be talking about more complex and dangerous things (especially in spite of recent Fukushima accident) – building nuclear reactor at home, which would be able to generate electricity. And before you will start worrying or being skeptical in advance (see Radioactive boyscout) I will say that everything mentioned in this article is more or less safe (at least, as safe as working with Hydrofluoric acid at home), so I strongly recommend anyone to not try this at home. Also, before thinking of doing something – talk to your lawyer – laws are different country-to-country, and many are already in prison
What are the ways of building nuclear reactor at home?
Nuclear fusion
Heavy Hydrogen (deuterium) is comparably easy to obtain at home – you just need multistage electrolysis of tap water. But there is a tiny problem – even top-end scientists still unable to build reactor which would produce electricity via fusion. So, I guess this way is not feasible for now.Nuclear fission
In the simplest case you just need raw uranium (without any enrichment), and some water (as it's both neutron reflector & moderator). The only problem is that this way you need several hundreds of tons of uranium - and you are not going to get that much without getting too much attention
Are we stuck? There is no way out? Let's take a look at the sky! There are a lot of spaceships, using radioisotope thermoelectric generators – basically they convert energy of passive radioactive decay into usable electricity (BTW that's the major physical cause of the Fukushima problems – even if you shut down reactor, it will generate 7% as much heat at the first minutes, 1% during first weeks, and they will slowly go down to 0.1% of thermal energy generation. I.e. if you have 700MW reactor unit, you will have to dissipate 7MW of heat somehow in the first weeks)
Let's think deeper in this direction. There are 3 major types of radioactive decay:
Gamma-decay
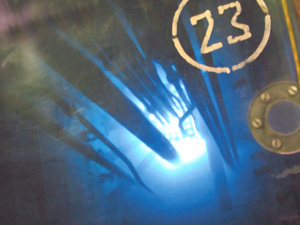 Sources of gamma radiation are widely used in medical and industrial applications. Most of them are based on Cobalt-60 or Cesium-137 (sadly known after these nuclear disasters). The problem is that gamma radiation is very dangerous, and very hard to shield – 1cm of steel won't save you (see this funny Cherenkov's glow at the right). So, let's try to avoid there. Also, every year lots of guys get free food in jail for trying to sell (or buy) gamma-sources illegally
 PS.If you want to be precise,Co-60 and Cs-137 does not directly emit gamma radiation – it's their short-lived decay-products.
Alpha-decay
Sources of alpha-radiation are widely used in smoke detectors, spark generators, some gas-filled radio-tubes. Ones of the most known isotopes – Americium -241. Alpha-radiation is very easy to shield – just a sheet of paper will stop it, but it's very very dangerous if inhaled or eaten (See the myth of Bloody KGB killing Litvinenko). Anyway, getting significant amounts (over few micro-grams) of alpha-emitters is very hard, so it looks like this way is also not feasible. That's so sad…. The most efficient thermoelectric generators are based on alpha emitters, especially Plutonium-238 (not 239!) – it gives you 0.5 Watt of power per gram, half-life – 87 years (and it costs about 1 megabucks per kilogram).Beta-decay
Beta radiation (basically,electrons/positrons) are quite easily to shield, and have very useful property – it electron hits molecule of phosphor – it will emit light. Also, it most countries ‘safe' beta-emitters are quite legal for general public, so we can simple go and buy these multicolored glow key chains. So, it looks like beta-decaying isotopes are our best bet on building homemade nuclear reactor.The core of our reactor – tritium capsule, bought from well-known DealExtreme(but there are lots of shops selling these) - http://www.dealextreme.com/p/mini-tritium-glowring-keychain-10-year-green-glow-6830 . 9.7$. Formally radioactive items are prohibited to be sent by mail, but apparently dealextreme does not know about it
Safety
Low-energy beta radiation cannot get out of capsule casing, and helium is not radioactive. If one brakes the capsule and accidentally inhale tritium – irradiation would be minimal, as human body does not ‘use' pure hydrogen. But if it get burn into water, it might end up being part of your body cells, and you will get maximum possible radiation over next few decades. So, don't break, don't burn and don't inhale it So, Tritium is a ‘superheavy' hydrogen, it has half-life of 12.32 years. It's decay products are Helium, electron (6.5kEv, and for picky readers, an antineutrino). We'll gather energy with solar cell, fed up into MCP1640 step-up boost converter (works down to few tens of volt at the input), will charge 1F/5V EDLC (supercapacitor) and an red led as the load.
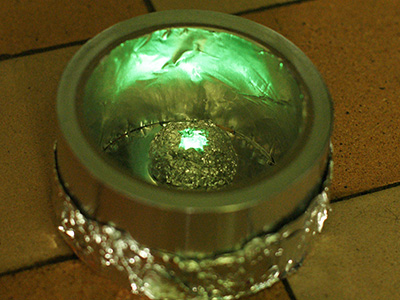 In order to gather as much light as possible, I put capsule into reflector made of aluminum foil + cover everything with foil from the inside.
 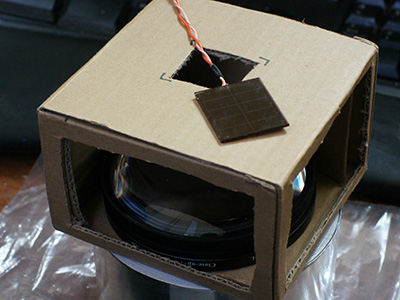 In order to focus light on solar cell I use 2x 10 diopter lenses . On the photo you see solar cell before gluing, tritium capsule is not set up.
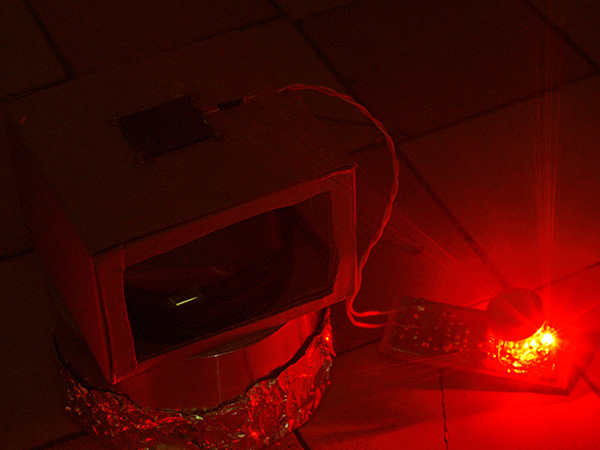
Connect it all, turn off the lights, wait a minute or two to charge supercap, and here is the result:
Is it "Free energy"?
Surely not :-) This reactor produces just about 7mW of power (and after 12.32 years it will be 3.5), so while it is ok for a LED, it's way too low to charge your notebook . From the other side, 10 of these modules can power cell phone in stand-by for several decades :-) Here goes price calculation: capsule :9.7$, solar cell : 5$, lenses 13.8$*2 = 42$ per module. For 10 of these you will need to fork out 420$... From the other side, there are bigger capsules - for 35$ - maybe they will be more cost-efficient.
Comments/questions/opinions – are welcome :-)

radioactive source
Asico Thyratron Valve (2D21) On Board, AE 180
https://www.indiamart.com/proddetail/asico-thyratron-valve-2d21-on-board-ae-180-11370141055.html
https://www.indiamart.com/…/asico-thyratron-valve-2d21-on-b…
https://www.indiamart.com/proddetail/asico-thyratron-valve-2d21-on-board-ae-180-11370141055.html
https://www.indiamart.com/…/asico-thyratron-valve-2d21-on-b…


so, what else, do I magically have at my house, with radioactive sources, as 0.4 microcuries of cesium 137??? ..." used as backlights for computer and television liquid-crystal displays...""A self-luminescent light source for a liquid crystal display watch characterized by comprising a fluorescent substance layer which has a light reflectivity and which contains a radioactive substance in at least a part thereof, a reflective layer which is disposed on one surface of the fluorescent substance layer and which serves to reflect and scatter fluorescence from the fluorescent substance layer"

SO LET'S PREPARE OUR MASSIVE WEAPON
How to Replace a LCD Backlight

Here are some simple instructions on how to replace a burnt out LCD backlight with a new working one to bring your LCD back to life. Inevitably, every LCD eventually goes dark, but the process to bring it back to working order is not very hard. As long as you are careful, it can be done successfully and without too much drama. Generally this is a very cheap repair, usually only around $10-20.
This instructable will be performed on a laptop LCD from an old Zenith Data Systems computer. I tried to make this instructable pretty basic and not extremely detailed because every LCD screen is different. Your LCD will be different from mine (how its held together, the number of CCFL's, etc) but the concepts will remain the same. Feel free to send me any questions you might have, and I'll try to help you out.
Materials:
Replacement CCFL (Cold Cathode Fluorescent Tube)
Tools:
Small Phillips Screwdrivers
Torx Screwdrivers
Electrical Tape / Soldering Iron
Step 1: Disassembling the LCD Housing


To get the the LCD screen and the backlight inside, you must first disassemble the LCD housing; this is different depending on whether it is an external monitor, or built into a laptop. But first before disassembling the housing, DISCONNECT THE POWER!
EXTERNAL LCD MONITOR: Usually to get inside of an external monitor, you will have to simply take out all the screws on the back of the display and pull it apart. Pretty simple.
LAPTOP LCD (Shown): This can be a little more frustrating at times, but not impossible. First open up the laptop and locate all of the screws (sometimes these can be hiding under rubber feet). After removing the screws, many times you will also need to use a flat head screwdriver to pry the housing open little by little. Be gentle,, but don't be afraid to use a little force.
After getting the back of housing off the computer, disconnect the LCD from the inverter.
Now completely detach the LCD from the housing by removing the remaining screws.
Step 2: Taking Apart the LCD Itself


Now comes the most interesting part (and the part where you must be the most organized and careful!), disassembling the LCD itself.
In this step make sure that every element of the LCD you remove is kept in perfect order so you can easily reassemble it after replacing the lamp(s). The LCD I am disassembling really didn't require me to remove too much to get to the CCFL's, but many times you will need to remove several layers of transparent sheets that are used to spread the light uniformly throughout the screen.
Just like before, locate and remove the screws holding the LCD assembly together. Take the assembly apart including any transparent sheets in the way of the cold cathode tubes.
REMEMBER! Stay organized for your own sake!
Step 3: Remove the Backlight


In this step you must be very gentle. The lights contain mercury and are very fragile. This step is not that difficult, just be patient. Do not use any force when removing the CCFL or it will break (I speak from experience). I would suggest that you loosen the wires from the LCD first and then gently remove the CCFL.
Step 4: Insert Your New Backlight


Take your new CCFL and insert the lamp exactly where the old tube was located. Again, be gentle and this step will be easy.
After inserting the new CCFL and routing the cables correctly, reassemble the LCD the same way you took it apart.
After inserting the new CCFL and routing the cables correctly, reassemble the LCD the same way you took it apart.
Step 5: Test Out the Display


After putting your LCD back together, reattach the inverter and any other cables that may have been connected to the display. Next, before putting the housing back together completely, test out your display to make sure everything is in correct working order.
NOTE: Be VERY careful with the exposed connections and cables, ESPECIALLY the Inverter. Touching the wrong part could not only hurt you, but damage your display. Yet again, I speak from experience.
NOTE: Be VERY careful with the exposed connections and cables, ESPECIALLY the Inverter. Touching the wrong part could not only hurt you, but damage your display. Yet again, I speak from experience.
Step 6: All Done!
Make sure all your connections are tight, and theres no extra screws. Finish reassembling the LCD housing and you're all set!
Again, feel free to send me any questions, comments, or suggestions for this Instructable!
Thanks for reading!
Ryan Merrick
Again, feel free to send me any questions, comments, or suggestions for this Instructable!
Thanks for reading!
Ryan Merrick
Subscribe to:
Posts (Atom)
